Author Archives: brandonio21

Organizing a Small-Scale Programming Competition: Question Writing

As soon as I joined the committee, I got started working on the next competition and learned about the processes in place. We constantly worked to improve them. In this post, I will talk about old processes, why they existed, and how we attempted to improve them.

Writing Questions

Writing questions for the competition is the most important step in the competition design process. In our committee, question writing was done by a designated group of committee members. They would write a rough-draft of their question, a small sample, and potential background stories. After a few weeks, the committee gathered to review all questions and narrow them down to the 15 we would use for the competition. To do this, we gave each question a difficulty rating of easy, medium, or hard. We then eliminated questions until all that remained were the 15 we would use, where the majority of them were “medium” difficulty.

Writing Test Cases

Of course, we also needed to create a collection of test cases to test contestant’s programs against. The test cases consisted of both INPUT and OUTPUT. Creating these test cases by hand for each problem posed a problem: crafting inputs was easy, but doing the work to calculate the expected output by hand was challenging. Further, we wanted a fairly large number of inputs to catch any corner-cases that contestants may have missed.

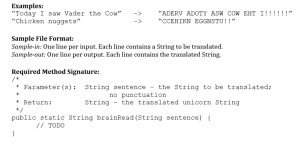
Sample Cases, Input / Output, and Method Stub from the Fall 2014 competition

Another challenge was test case formatting. Test cases had to be fed to contestant’s programs, whose output then had to be verified. Some of our test cases were also pretty complex (e.g Given a 2D array which represents one map, a 2D array which represents locations of hazards, find a path to the square with coordinates (X,Y)). Contestants definitely shouldn’t have to write this parsing code and instead should only focus on solving the problem in a pre-defined function stub.

Thus, the following problems had to be solved:
1. Given hand-crafted input, auto-generate output that we would use for judging contestants.
2. Provide the contestants with programs that already contained input-parsing and output-formatting logic. Contestants would simply complete a function stub.

Behold: “Template Writers” and “Solution Writers”

We solved the problem by having committee members be “solution writers”, who would act just as the contestants. For each problem, a “template writer” would write a template program that parsed input/output. Solution writers would then use the template and implement the function stub. As long as there were 3-or-so solution writers for each problem, this went very well. After everyone was finished, input could be added into a single file and provided to the solution writer’s programs. If all their outputs agreed, this input/output combination would be considered a new “test case”.

Eventually, we settled on a standard input format (separate test cases were delineated with newlines, components of each test case were determined by the template writer) and a sort-of standard template pattern.

Below is a Java template and case input for a problem in Fall 2014:

import java.util.*;

public class Problem4 {

  //Parameter(s): char ch - the character to be searched for in the String
  //              String phrase - the String to be searched through
  //Return:       int - the number of character triples in the String
  public static int spyingOnTriplets(char ch, String phrase) {

    //YOUR CODE HERE

    return 0;
  }


  /////////////////////DO NOT MODIFY ANYTHING BELOW THIS LINE///////////////////
  public static void main(String[] args) {
    Scanner in = new Scanner(System.in);
    ArrayList<String> input = new ArrayList<String>();
    while (in.hasNext()) {
      input.add(in.nextLine());
    }
    for (int i = 0; i < input.size(); i++) {
      char searchLetter = input.get(i).charAt(0);
      String searchString = input.get(i).substring(2);

      System.out.println(spyingOnTriplets(searchLetter, searchString));
    }

  }

}
d ddidddd
f ffffffluffffffy
f fluffyyyyy
z heyhowyoudoin
o ooooo
o oooo
b blblbl
b bbb
c c-c-c
' '''
- -----
p chicken


At the time, we continued writing inputs and templates by hand. However, we put a lot of effort into PCFramework, which was a collection of shell scripts that would allow all testing of test-cases to be handled automatically.

As an example, basic workflow looked like:

cd BPCFa15/Solutions/dev # Move into the solution writer directory
cp ../Templates/Problem1.java Brandon/ # Move the template into my own workdir
vim Brandon/Problem1.java # Fill in the function stub with my solution
./test.sh 1 Brandon # Test my solution against "sample input" and "corner input", which are hand crafted
./compare.sh 1 Brandon Dylan Marisa # Compare outputs of solutions and verify they are the same
cp Brandon/problem1.out tests/problem1.out # Move Brandon's output into the official tests folder

This allowed us to have “Sample inputs” (sanity inputs whose outputs were provided), “Corner inputs” (Difficult corner cases whose outputs were hand-crafted), and “Generated inputs” (inputs that we created by hand but whose outputs were generated by solutions).

Other Benefits of Solution Writers

On the surface, solution writers provided the competition with usable outputs. In addition, the process of crafting solutions by hand provided us with insight into other metrics, such as how difficult the problems really were and how easily they could be understood. More than once, we revoked a question from the question pool after we discovered that no solution writers could agree upon a solution.

On one occasion, we discovered that one of our problems actually boiled down to a difficult scheduling problem and none of our solution writers could optimally solve it. Obviously, this question was pulled.

A “golden solution” for the above problem:

import java.util.*;

public class Problem4 {

  //Parameter(s): char ch - the character to be searched for in the String
  //              String phrase - the String to be searched through
  //Return:       int - the number of character triples in the String
  public static int spyingOnTriplets(char ch, String phrase)
  {
    int count = 0;
    char[] characters = phrase.toCharArray();
    for (int i = 0; i < characters.length - 2; i++)
    {
      if (characters[i] == ch &&
          characters[i+1] == ch &&
          characters[i+2] == ch)
      count++;
    }
    return count;
  }


  /////////////////////DO NOT MODIFY ANYTHING BELOW THIS LINE///////////////////
  public static void main(String[] args) {
    Scanner in = new Scanner(System.in);
    ArrayList<String> input = new ArrayList<String>();
    while (in.hasNext()) {
      input.add(in.nextLine());
    }
    for (int i = 0; i < input.size(); i++) {
      char searchLetter = input.get(i).charAt(0);
      String searchString = input.get(i).substring(2);

      System.out.println(spyingOnTriplets(searchLetter, searchString));
    }

  }

}


Supporting More than Java

The usefulness of these verification tools quickly became evident. Since verifying inputs/outputs was now trivial, we could start supporting languages other than Java in our competition (as long as someone wrote a template and we had enough solution writers). Due to contestant demand, the first additional language we supported was C++.

At this point, our competition moved to HackerRank to manage contestant solutions and inputs/outputs.
Driving CA1 (PCH) from Temecula to Mountain View

I’ve been a Southern California resident all of my life, yet I have not once driven on the famous CA1 (Sometimes called “Pacific Coast Highway” or “Cabrillo Highway”). My recent move from sunny San Diego to Silicon Valley seemed like the perfect moment to experience the famous highway.

I planned the trip to take 2 days and I would drive a rental car with a trunk full of my dearest possessions (basically clothes and my computer). For a semi-leisurely trip, 2 days seems like the minimum (One could accomplish the trip in 1 day if they made no scenic stops, started early, and ate only on-the-go).

Leg 1: San Diego to UCLA

The CA1 does not actually start until Santa Monica. Thus, I decided that I would visit family at UCLA for the first portion of my trip. I took the usual commuter route (I-15N -> I-91W -> I-405N) and arrived in 3 hours. Unfortunately, I left San Diego around 10AM and got slammed with constant stop-and-go traffic once I reached the LA area.

Leg 2: UCLA to CA1

I originally planned to get lunch at Ike’s in Westwood, but could not find parking. Actually, I think that circling Ike’s block took more time than my visit to UCLA itself. Mid-day Westwood traffic is no joke. After circling once, I decided that I would hit the road and find lunch along the way.

Getting from Westwood to the CA1 is extremely simple. The I-10W dumps right into the CA1, so I simply took I-405S -> I-10W -> CA1. From there, the surroundings quickly shift from Santa Monica beach city to motels/restaurants to nothing-but-nature.

Leg 3: CA1 to Cambria

The hotel room I booked for the night was in Cambria, which Wikipedia notes as the midway point for the CA1. Getting there was no problem, albeit a little confusing since CA1 and 101 intermingle. (When in doubt, follow signs for 101N and CA1N, prioritizing those for CA1N). I eventually reached Cambria after a very beautiful drive. The CA1 was closed about 10 miles north of Cambria.

Of course, I had to make a stop at Hearst Castle.

Leg 4: Cambria to 26-Mile CA1 Big Sur

Since CA1 was closed just north of Cambria, getting out of Cambria actually required some backtracking. I took the CA1S toward 46E, which connected to 101N. I then had to take 101N until it reconnected with CA1. Luckily for me, this drive involved driving through some beautiful farmland. Getting stuck behind slow tractors was annoying, but the smell of ripe, in-season strawberries was probably my favorite part of the trip.

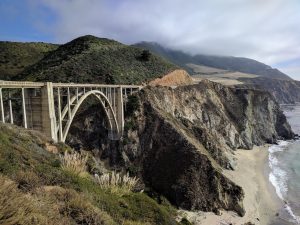
After following 101N for a couple hours, it reconnected with the CA1. The Big Sur portion of CA1 is not to be missed, so I took CA1 south for 26 miles. Along this route are beautiful ocean views, plenty of turnouts for pictures, and the famous Bixby Bridge. Of course, once I reached the end of the 26 mile stretch, I had to turn around.. but it was worth it. This stretch added about two hours to my journey, including stops.

The beautiful Bixby Bridge.

Leg 5: CA1 Big Sur to Mountain View

The final portion of my trip was driving up to Mountain View. It was getting late, so the sun was setting and traffic on CA1 was thinning. The ocean fog was rolling in, making for an even cooler drive. Along the way, I stopped at a lighthouse for pictures.

Eventually, I reached 92E which signs indicated “San Mateo”. I took it and followed signs to Mountain View. I arrived at around 7PM.

Organizing a Small-Scale Programming Competition: Background

My Story

Near the end of my first quarter at UCSD, I began seeing posts on Facebook which
advertised a “Beginner’s Programming Competition”. Students who have not yet
taken any upper-division Computer Science courses could solve small programming
questions. Whoever completed the most in the shortest time would be given a
prize. I’d been programming long before college, so of course I’d sign up.

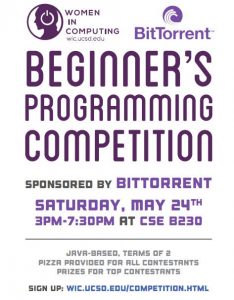
Advertisement for Spring 2014 Competition

The flyer for the first competition that I helped run. I got a BitTorrent T-Shirt

I arrived and was given a dedicated workstation and a packet of questions. We
had three hours to solve as many problems as we could using Java. All
submissions were to be sent through PC2 and three winners would be announced at the end.

I learned three things that day:

  1. A competition environment makes programming very stressful and much more
    difficult.
  2. I was not the only one who had been programming “long-before college”
  3. I was hooked.

I did not win. Heck, I didn’t even place in the top 10. But I had a blast.

Next quarter, I teamed up with a long-time friend and we ended up placing in
the top 5. I was satisfied and immediately signed up to join the committee. I
would spend my entire college career working to improve the competition.

What Was So Great?

Obviously, I had a good enough time while competing to justify joining the
committee. Indeed, the competition did a lot of things right.

  1. The beginners-only spirit of the competition made it easily accessible for
    me. It also thoroughly proved the joys of programming without intimidating
    me into my own self-loathing.
  2. All of the questions had cute backstories and the competition had an
    overarching theme. For my second competition, all questions followed an
    unnamed chef as he encountered difficult problems in the kitchen. This
    really helped lighten the mood and made it enjoyable.
  3. Balloons. There were people whose sole job was to deliver balloons to
    contestants every time they solved 2 problems. Not only was this a morale
    booster while struggling, but it was also fun. Some even had little faces
    drawn on them.
  4. The competition was run by students, for students. Something about
    partaking in a competition designed by my fellow students made the problems
    seem even more solvable. (If my TA wrote the question, there must be an
    easy solution!
    ) Further, the competition was not too corporate. Sure, there
    was a small corporate sponsor, but they only provided some prizes to the
    winners. Definitely nothing too in-your-face.
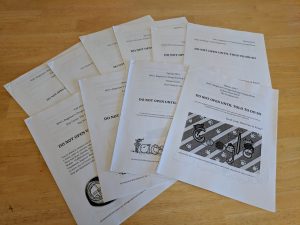
The question packets for each year I was involved in the competition

The question packets for each year I was involved in the competition.

What Could Be Changed

When I first joined the committee, I didn’t think much about improving the
competition. I simply wanted to help build it. Of course, I spent a lot of
time building tools to help create the competition, but it wasn’t until later
that I realized there was still work to be done. Most of this work was realized
because of post-competition-feedback we got from our contestants.

The biggest complaint was that contestants could only program in Java. Intro
computer science classes taught in Java, but many contestants were coming in
with pre-existing knowledge of Python and C++.

Some other contestants complained that prizes were lame. It was true. It cost
money to run the competition, so we asked programming-related companies to
provide us with funds and in return they could provide their latest tech
(read: advertisements) as prizes to the winners. Unfortunately, this meant that
companies often sent branded glasses, t-shirts, and stickers. No one felt good
about taking first place in a 3 hour competition only to receive a sticker.

Finally, the logistics of running the competition were a mess. Sure, we had
PC2 to help facilitate checking correctness, but volunteers were running around
like crazy delivering balloons, answering contestant questions, and ensuring
that no one was cheating. This meant that volunteers ran to the “control room”
to get a balloon, looked at a whiteboard to see who needed a balloon (the
whiteboard was managed by someone repeatedly refreshing the scoreboard), and
ran the balloon to the contestant. Over and over again.

I absolutely loved the competition and loved being on its committee even more.
In the next posts, I’ll detail how we decided to manage the logistics of
creating and running each competition. Hopefully they are useful to some other
competition would-be-designers.

Setting a Windows Desktop Background in Rust

While working on wallers, I came across the need to set the desktop background for Windows machines. For Linux machines, the answer was simple: delegate to feh. For Windows, I needed to delegate to a Windows API call.

The Windows API call of interest is SystemParametersInfo, specifically with the action as SPI_SETDESKWALLPAPER (20 in decimal). For SPI_SETDESKWALLPAPER specifically, the second and fourth parameters are not used, so they can be set to 0. Thus, in order to change the desktop wallpaper, one would call

SystemParametersInfo(20, 0, "path/to/wallpaper.png", 0)

In particular, this function is found in user32.dll. Luckily, retep998 has created a Rust binding for it and it is available as a crate. With this knowledge, changing the desktop wallpaper becomes quite trivial. The only complication is that there are two forms of SystemParametersInfo : SystemParametersInfoA and SystemParametersInfoW. From what I’ve gathered, the former should be called on 32 bit systems while the latter is called on 64 bit systems. This works on my desktop machine; however, on my 64bit Surface Book, SystemParametersInfoW sets the wallpaper to black while SystemParametersInfoA works as intended.

The final bit of difficulty comes in that these functions accept a *mut c_void as a parameter rather than a string (making the function unsafe.. sad). Thus, conversion must also take place.

extern crate user32;

use std::ffi::CString;
use std::os::raw::c_void;

fn set_wallpaper(path: String, force_32bit: bool) -> Result<(), ()> {
 let wallpaper_func = if force_32bit || cfg!(target_pointer_width = "32") {
        user32::SystemParametersInfoA
    }
    else {
        user32::SystemParametersInfoW
    };

    // do work to get the pointer of our owned string
    let path_ptr = CString::new(path).unwrap();
    let path_ptr_c = path_ptr.into_raw();
    let result = unsafe {
        match path_ptr_c.is_null() {
            false => wallpaper_func(20, 0, path_ptr_c as *mut c_void, 0),
            true => 0
        }
    };

    // rust documentation says we must return the pointer this way
    unsafe {
        CString::from_raw(path_ptr_c)
    };

    match result {
        0 => Err( () )
        _ => Ok( () )
    }
}

As you notice, we also insert a way for the user to call SystemParamtersInfoA on a 64bit system, just in-case…. Of course, since this uses OS-specific libraries, it’s best to use macros to prevent this code from running on non-Windows machines.

#[cfg(windows)] extern crate user32;

#[cfg(windows)] use std::ffi::CString;
#[cfg(windows)] use std::os::raw::c_void;
#[cfg(not(windows))] use std::process::Command;

#[cfg(windows)]
fn set_wallpaper(path: String, force_32bit: bool) -> Result<(), ()> {
 let wallpaper_func = if force_32bit || cfg!(target_pointer_width = "32") {
        user32::SystemParametersInfoA
    }
    else {
        user32::SystemParametersInfoW
    };

    // do work to get the pointer of our owned string
    let path_ptr = CString::new(path).unwrap();
    let path_ptr_c = path_ptr.into_raw();
    let result = unsafe {
        match path_ptr_c.is_null() {
            false => wallpaper_func(20, 0, path_ptr_c as *mut c_void, 0),
            true => 0
        }
    };

    // rust documentation says we must return the pointer this way
    unsafe {
        CString::from_raw(path_ptr_c)
    };

    match result {
        0 => Err( () )
        _ => Ok( () )
    }
}

#[cfg(not(windows))]
fn set_wallpaper(path: String, _: bool) -> Result<(), ()> {
let result = Command::new("feh")
        .arg("--bg-fill")
        .arg(path)
        .status()?.success();

    match result {
        true => Ok( () ),
        false => Err( () )
    }
}


Moving Projects off of CodePlex

On March 31, Codeplex announced its plans to shut-down. Although this might be bad for competition in the hosted-repository space, I understand why Microsoft felt the need to shut-down its service.

Personally, I had 3 projects hosted on Codeplex: HTML-IDEx, UpdateVB, and NotifierForVB. I have decided to archive the latter two in a versioned zip file. Since HTML-IDEx has had some fairly recent membership requests, I moved it to GitHub.

Making the choice to archive UpdateVB and NotifierForVB was a tough one. After all, they were both artifacts of my first early years of programming and were used extensively in the software I created during that time. However, they both had not received any updates in nearly 7 years. Since I was quite the inexperienced programmer at that time, I also expect these libraries to be riddled with small issues and bugs.

UpdateVB is a unique case, since I actually started working on its successor in 2014. Thus, the decision to archive it was purely for historical purposes. If you are looking to use UpdateVB, please use update.net instead.

NotifierForVB, on the other hand, is a library that’s about 30 lines of code and strongly tied to the Krypton Toolkit (which is apparently now open source). Due to its simplicity and lack of usefulness, I’ve decided to archive it for historical purposes without a successor.

HTML-IDEx is my only project hosted on Codeplex that had real community collaboration. Further, it is the only open-source project owned by BrandonSoft. Due to a few membership requests in 2017, its popularity, and its tie-in with BrandonSoft, I’ve decided to package the source code and move it to GitHub. If git is not your thing, a versioned zip archive will also be hosted here.

It was a tough decision to officially deprecate and decommission two of my older projects, but it was in the best interests of those who may have wanted to use the libraries (Definitely don’t use them!) and for me and my dwindling free-time.

Thank you to everyone who supported, used, and helped create UpdateVB, NotifierForVB, and HTML-IDEx. You can view the projects in the Archive section of the code page.