As you’ve no doubt noticed from my past 3 posts (all of which are about my “homelab”), I’ve definitely caught the homelab bug. My original goal was simply to get rid of my monthly payments to Dropbox and have some alternative to Google Photos – but this has turned into a hobby of sorts. Now, I’m kinda obsessed with getting all of my regularly running services and game servers well integrated into my homelab environment.
Last post, I talked about organizing the actual hardware into a rack and using a patch panel to route everything. Since then, I actually ended up moving the Proxmox box from an InWin Chopin case to the 2U Rosewill RSV-Z2600U case. The migration was very easy (the new case is HUGE compared to the old one), but required me getting a new power supply and 3 Noctua 80mm fans. So far, I’m very happy with the thermals and noise levels. Most importantly, it looks sleek sitting inside my rack – although now I’ve realized that my rack is a short-depth rack (14 inches) which doesn’t fit the 16 inch 2U case. So I’ll have to do something about that later…
On the software side of things, I’m slowly working towards moving to the ideal homelab. I’ve setup some goals for myself:
- Configure an internal reverse proxy so that I don’t have to remember port numbers and so that I don’t get SSL warnings everywhere.
- Finally split my network into four: a local network, a guest network, an IoT network, and a “DMZ” network which will run services exposed externally.
- Experiment with a “jumphost” – a remote VPS which is connected to the DMZ network via VPN. All connections to the DMZ hosts must then be through the jumphost and the only exposed ports on my home network should be a VPN for both the DMZ network and my local network. For now, this will only be used for game servers.
- Experiment with some way to bridge my homelab and my already deployed VPS (this blog and a few other websites).
The journey begins with the internal reverse proxy.
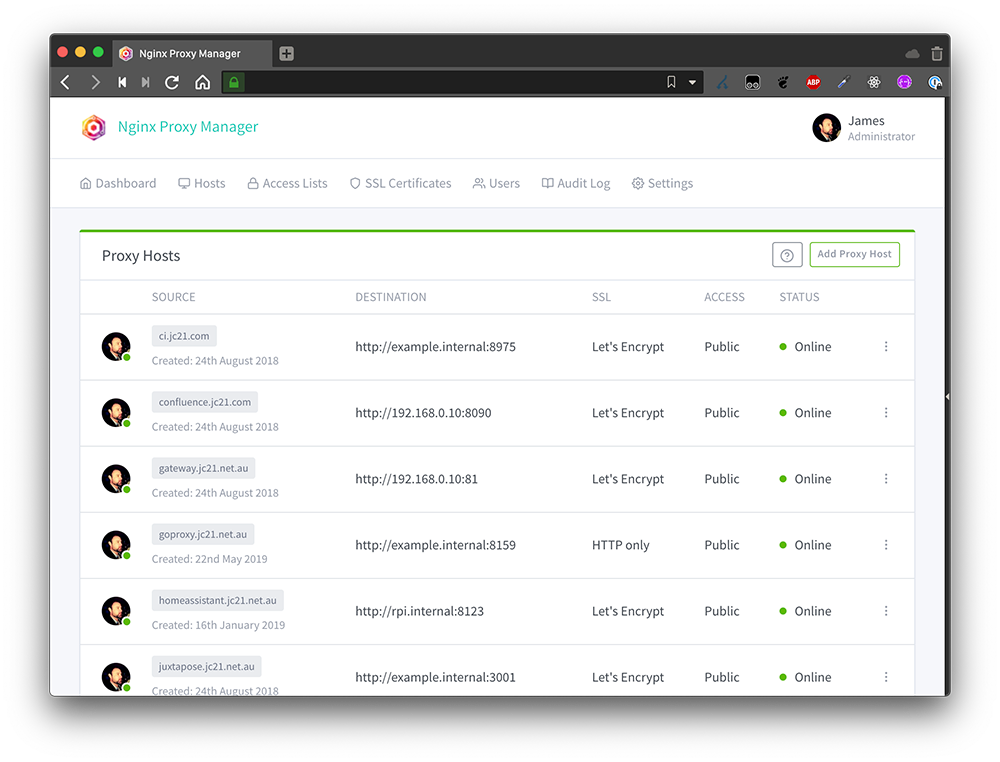
Software Choice: Nginx Proxy Manager
Apparently there are a few reverse proxies to choose from these days. In addition to the classic Apache and Nginx, I also found information about Nginx Proxy Manager, Traefik, and Caddy. I recently got experience with Nginx when I moved this blog from CentOS/Sentora to ArchLinux/Nginx, so I decided that I would stick with the Nginx stack. In addition, Nginx also recently added support for reverse-proxying TCP/UDP while most other options only had HTTP support. This would be useful for gameservers.
So the choice came down to using vanilla Nginx and using Nginx Proxy Manager.
- Nginx: I already know how to set it up, but I often forget the config file syntax and have to Google about how to use it. Luckily, I don’t plan on doing anything fancy (just subdomain –> hostname/port mapping) so this shouldn’t be too hard. Also I can easily backup the configs.
- Nginx Proxy Manager: Basically nginx (fast), but with an easy to understand UI. I wouldn’t have to Google anything, but I risk the UI creating janky nginx configs or not supporting an nginx feature that I want later down the line. For backups, I can just host this on a Proxmox container and just backup the container image.
Ultimately, the easy-to-understand UI in Nginx proxy manager won me over. It also supports TCP/UDP (Which nginx calls “streams”) which was a plus.
Nginx Proxy Manager Setup
Setting up Nginx Proxy Manager was easy-peasy using Docker Compose. I’m definitely not the biggest Docker power-user, but I like using Docker Compose for easy-peasy spinup. In Proxmox, I have a Debian template image with docker/dockercompose pre-installed that I use for all my VMs. I clone the template, fill out docker-compose.yml, and I’m off. It’s probably not great that I’m only running a single docker image in each container, but for now it’s totally fine.
So – I created a new “npm” container and copy/pasted the Docker Compose config from the website. It worked like a charm:
services:
  app:
    image: 'jc21/nginx-proxy-manager:latest'
    restart: unless-stopped
    ports:
      - '80:80'
      - '81:81'
      - '443:443'
    volumes:
      - ./dockerdata/data:/data
      - ./dockerdata/letsencrypt:/etc/letsencrypt
I started setting up “Proxy Hosts” for services which had ports that I could not remember. The first was proxmox (who can remember port 8006? not me) – so I created the “proxmox.[internaldomain.com]” proxy host and redirected it to the host “proxmox.[internaldomain.com]:8006”.
You might see the problem here… in my homelab network, I votwed to never use IPs directly because I would forget them. Instead, I relied on my Unifi Dream Machine’s internal DNS settings which automatically created entries for [Hostname].[InternalNetwork.com], where InternalNetwork.com was a domain name that I populated (which I also own publicly). I was already navigating to proxmox.[InternalNetwork.com]:8006 to access the Proxmox UI.. so if the hostname already took the “proxmox” name, what would I name the Proxy Host?
I spent an emabrrasingly long time thinking about this and googling to see what other people had done. There were three primary options I was considering:
- Just avoid collisions. Keep the Proxy Hosts and actual hostnames on the same domain, but keep a mental note to avoid collisions. I hated this idea because I’m bad at remembering things and I also feared adding some new host down the line that collided with a proxy host.
- Create a new subdomain for the proxy (something like
proxy.[InternalDomain.com]). I also wasn’t a fan of this idea.. the whole point of creating the proxy was so I could remember less and I didn’t want to remember that everything served by the proxy had to be prefixed with “.proxy”. - Move all hostnames to a different subdomain and use the top-level domain only for the proxy. This is what I ultimately went with.
I realized that eventually I wanted to split out my network into four networks (guest, iot, dmz, and local) – so now would be a perfect time to create a new subdomain for each network starting with local.[InternalDomain.com] for all hosts on my local network. Then, the proxy could have toplevel service.[InternalDomain.com] records and delegate them to the hosts in the local network.
Of course, this took some patience as I had to change a bunch of config files which referred to hosts: hostname.[InternalDomain.com] -> hostname.local.[InternalDomain.com]. But it worked.
Since I use pihole for my internal DNS server (adblocking), I setup my proxy A/CNAME records there:
- I added an A record
proxy.[InternalDomain.com]->npm.local.[InternalDomain.com]. - For every service served by the proxy, I added a CNAME
service.[InternalDomain.com]->proxy.[InternalDomain.com].
I setup all of my HTTP internal services this way: Synology Drive, Synology Photos, Unifi Controller, Jellyfin, and Proxmox.
Actually, setting up Proxmox without SSL didn’t quite work. Apparently the Proxmox internals only work over SSL, so I needed to use a special config in Nginx Proxy Manager to redirect all Proxmox to SSL. To do so, I needed to figure out exactly how the UI created “custom configs” and where the “custom configs” were included. Here’s what I used (note the mismatching braces which match with braces in the top-level config where the custom config is included):
rewrite ^(.*) https://$host$1 permanent;
}
server {
  listen 443;
  proxy_redirect off;
  server_name proxmox.[InternalDomain.com];
location / {
                proxy_pass https://homelab.[InternalDomain.com]:8006;
                proxy_buffering off;
                client_max_body_size 0;
                proxy_connect_timeout  3600s;
                proxy_read_timeout  3600s;
                proxy_send_timeout  3600s;
                send_timeout  3600s;
        # Enable proxy websockets for the noVNC console to work
                proxy_http_version 1.1;
                proxy_set_header Upgrade $http_upgrade;
                proxy_set_header Connection "upgrade";
        }
Finally, SSL
As a final step, I enabled SSL. This was fairly straightforward: I used the built-in option for creating a new wildcard certificate for *.[InternalDomain.com]. Since my hosts are not publicly accessible, I had to use a DNS challenge for this – but no problem.
I then used the UI to “Force SSL” onto my wildcard cert for all proxy hosts. Viola – no more Chrome/Firefox warnings about insecure connections. Once I did this I was also able to remove the gross custom Proxmox config noted above.
Conclusion
After using this setup for about a week, I’m pretty happy. The quality of life improvements are tremendous… I’ve saved atleast a few seconds off every day. Priceless. (When will those seconds surpass the time I spent setting up the reverse proxy? Probably never…)
I still have some doubts about the setup. For example, having all of my internal services rely on a single host for routing isn’t ideal… but if Nginx Proxy Manager is ever having problems, I could always fall back to the hostname and port.
After all, this is a homelab… I don’t want to spend too much time thinking about 24/7 uptime. That’s for my dayjob.